How to Install WordPress on cPanel Hosting : Step-by-Step Guide
Embarking on your WordPress journey? Exciting times lie ahead! At JuJu Hosting, we understand that getting started is half the battle. In this step-by-step guide, we’ll walk you through the seamless process of installing WordPress on your cPanel hosting. Let’s dive in and turn your web hosting into a WordPress powerhouse.
Step 1: Log in to Your cPanel Account
After purchasing your JuJu Hosting plan, log in to your cPanel account. This is your hosting control panel where you can manage various aspects of your website.
Step 2: Locate the Softaculous App Installer

Navigate to the “Software” or “Services” section in your cPanel dashboard. Look for the “Softaculous” app installer – a powerful tool that simplifies the installation of popular applications like WordPress.
Step 3: Find WordPress in Softaculous
Once inside Softaculous, locate the WordPress icon or search for “WordPress” using the search bar. Click on the WordPress icon to proceed with the installation.
Step 4: Start the Installation Process
Click on the “Install Now” button to kick off the installation process. You’ll be prompted to fill in some basic details:

- Choose Protocol: Select the appropriate protocol (usually, it’s best to stick with “http://” or “https://”).
- Choose Domain: Pick the domain on which you want to install WordPress.
- In Directory: Leave this field blank if you want WordPress to be installed on the main domain.
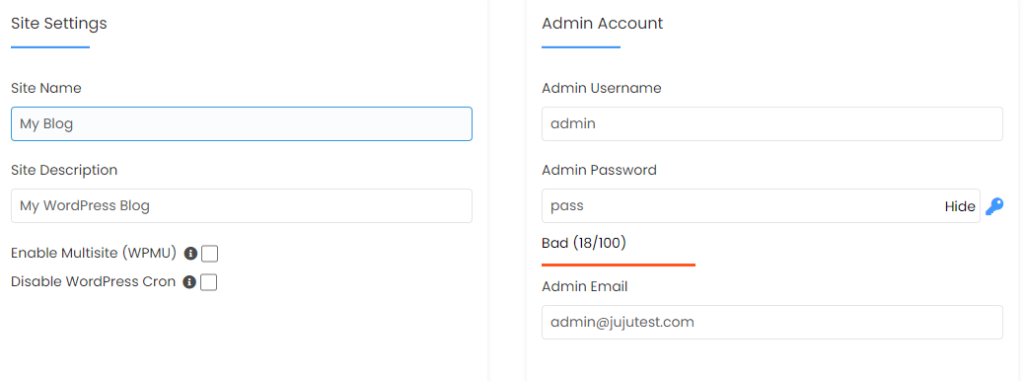
Step 5: Set Up Your WordPress Site
Fill in the essential information for your WordPress site:

- Site Name: Your website’s name.
- Site Description: A brief description of your website.
- Admin Username and Password: Choose a secure admin username and password.
- Admin Email: Enter your email address for important notifications.
Step 6: Choose Your Website Settings
Configure additional settings such as language, plugins, and theme. You can always customize these later within your WordPress dashboard.
Step 7: Complete the Installation
Double-check your details and click “Install.” Softaculous will now work its magic, installing WordPress on your JuJu Hosting cPanel. This process usually takes just a few minutes.
Step 8: Access Your WordPress Dashboard
Once the installation is complete, you’ll receive a confirmation. Now, you can access your WordPress dashboard by navigating to your domain or using the provided admin URL.
Conclusion: Welcome to WordPress!
Congratulations! You’ve successfully installed WordPress on your JuJu Hosting cPanel. Now, you’re ready to explore the vast world of WordPress, customize your site, and unleash your creativity online. Remember, JuJu Hosting is here to support you every step of the way. If you have any questions or encounter any issues, our support team is just a click away. Happy blogging!


