A Beginner’s Guide: How to Connect a VPS Using PuTTY
In the realm of web hosting and server management, Virtual Private Servers (VPS) have emerged as a popular choice for their flexibility, affordability, and control. Whether you’re a seasoned developer or just getting started with server administration, knowing how to connect to your VPS is a fundamental skill. One of the most common tools for this task is PuTTY, a versatile SSH client for Windows. In this guide, we’ll walk you through the process of connecting to your VPS using PuTTY.
What You’ll Need
Before diving into the connection process, ensure you have the following:
- VPS Credentials: You’ll need the IP address of your VPS, as well as the username and password (or SSH key) to authenticate.
- PuTTY: Download PuTTY from the official website if you haven’t already. It’s a lightweight and free utility.
Connecting to Your VPS
Follow these steps to connect to your VPS using PuTTY:
Step 1: Launch PuTTY
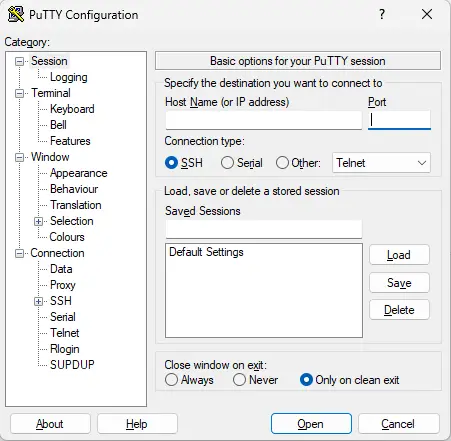
After installing PuTTY, launch the application. You’ll be greeted with the PuTTY Configuration window.

Step 2: Configure Connection Settings
- In the “Host Name (or IP address)” field, enter the IP address of your VPS.
- Ensure that the “Port” is set to 22. This is the default port for SSH connections.
- Select the connection type. For SSH connections, the default is fine (SSH).
Step 3: (Optional) Save Connection Settings
If you plan to connect to this VPS frequently, you can save these settings for future use. Enter a name for the session in the “Saved Sessions” field, then click the “Save” button.
Step 4: Initiate Connection
With the connection settings configured, click the “Open” button at the bottom of the PuTTY window.
Step 5: Authenticate
PuTTY will open a new window prompting you to login.
- If you’re using a username and password for authentication, enter your username and password when prompted. Note that for security reasons, you won’t see characters as you type your password.
- If you’re using SSH keys, PuTTY will automatically attempt to use any keys loaded in Pageant (PuTTY’s authentication agent). If your keys are passphrase-protected, you’ll be prompted to enter the passphrase.
Step 6: Explore Your VPS
Once authenticated, you’re now connected to your VPS via SSH using PuTTY! You’ll have access to the command line interface of your server, where you can execute commands, configure settings, and manage your server environment.
Conclusion
Connecting to a VPS using PuTTY is a straightforward process that empowers you to manage your server with ease. By following the steps outlined in this guide, you can establish a secure SSH connection to your VPS in no time. Whether you’re deploying web applications, hosting websites, or experimenting with server configurations, PuTTY serves as a reliable companion in your server management journey.


